Tie-Dye Everything
- Kris Hill
- Sep 4, 2020
- 2 min read
Updated: May 10, 2023


First Method: Markers and Rubbing Alcohol Method
You Will Need:
Material to Tie-Dye (honestly nothing beats a white cotton t-shirt)
Permanents Markers (I tried with both Sharpies and Copic markers)
Rubbing Alcohol
Small spray bottle, or liquid dropper
Rubberbands
Round objects such as buckets, bowls, and cups
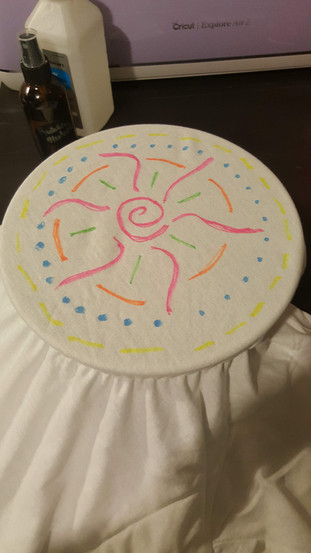
Step 1: Stretch one side of the material of the open expanse of your chosen round object, then secure it there by stretching a rubber band over the material covered object.
Step 2: Using your permanent markers, draw/color bold lines across your stretched material.
Step 3: Once you have reached your desired amount of marker coverage, begin to spray or use your liquid dropper to saturate the area with the rubbing alcohol. This will cause the marker ink to run and give that special tie-dye effect.
Step 4: Put your rubber band to the side, and remove the material carefully from the top of the object.
Step 5: Repeat steps 1-4 as desired.
Step 6: Allow to dry completely, and enjoy!
Second Method: Traditional Tie-Dye Kit

You Will Need:
Material to Tie-Dye (honestly nothing beats a white cotton t-shirt)
Tie-Dye Kit
Squeeze Bottles (Usually Available with Kit)
Rubberbands
Zipper Locking Snack Bags
Step 1: Prep your tie-dye inks and set up a space you are prepared to possibly get a little dirty. I chose to do my dyeing outdoors to minimize mess.
Step 2: Pick a tie-dye style and layout the number of rubber bands you will need beside your material. (I chose the traditional spiral style, for this style a fork comes in handy).
Step 3: Twist and band your material as the style calls for. For my chosen style I used a fork to twirl the shirt up, then banded it 4 perpendicular rubber bands to ensure that it looked like a perfectly pre sliced pie.
Step 4: Using the squeeze bottles to help direct the colors, use the dyes to fill up the individual spaces of material not covered by rubber bands. You can follow any color theme you desire. Go monochrome, alternate a rainbow of hues, it is up to you.
Step 5: Turn your banded material over and repeat Step 4 and the clean side.

Step 6: After you are satisfied with the level of dye saturation, put your still banded material into a zipper locking snack bag, and seal up.
Step 7: Let material sit in a bag for a minimum of 4 hours.
Step 8: After the proper amount of time has lapsed, remove the material from the bags, and begin rinsing the material out as you remove the rubber bands. Make sure material is completely rinsed out until the water is clear before setting material to dry.
Step 9: Dry and Enjoy!

-Kristie Hill, Library Associate


Comentários